Photographing
Birds Photographing
Birds
Learn how to photograph birds to make bird watching
more fun. There is a rush of excitement when you capture
the bird in a photo just the way you wanted. Even though
there are countless photos of that bird, it is a great feeling
when you took it yourself. Bird photography is easy to
get hooked on.
Yes there will be plenty of bad photos but the good ones
make it worth it. Here are a few photography tips.
Patience in Bird Photography
 Photographing
birds requires patience. Most birds are afraid of
people, and all species have their own comfort zone.
With a little time you can learn the comfort zone of the birds
you are photographing. If you get to close and scare
them off many birds will come back if you just sit still for a
while. Once they perceive that you are not a threat you
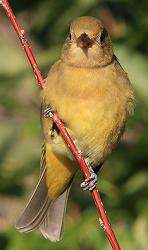
may be able to get closer. Sometimes they will be curious and
come close to study you, creating interesting opportunities,
as when this tanager came in to look at me. Photographing
birds requires patience. Most birds are afraid of
people, and all species have their own comfort zone.
With a little time you can learn the comfort zone of the birds
you are photographing. If you get to close and scare
them off many birds will come back if you just sit still for a
while. Once they perceive that you are not a threat you
may be able to get closer. Sometimes they will be curious and
come close to study you, creating interesting opportunities,
as when this tanager came in to look at me.
Type or Style
Your reason for photographing birds may determine your
style, and the kind of equipment you use. If you are just
recording the kinds of birds you see you don't need to get as
close, and you can use less expensive equipment then you need
for high quality prints.
 My
approach to bird photography is usually to just walk through a
wooded area and photograph the birds I see. I like
taking hand held shots. I know that I could get better
quality images if I used a tripod but the experience with a
handheld camera is much more enjoyable. I am able to
respond faster to a bird that perches next to me, and move with
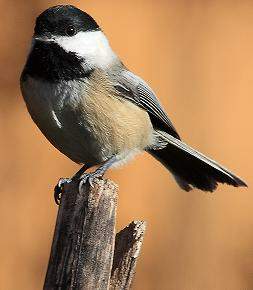
the bird when it moves. The chickadee in this photo
landed on an apple above me and was only there for a few
seconds. While I would have liked to have time to make adjustments,
if my camera had been on a tripod I wouldn't have even gotten
the shot. It's true you can get more crystal
clear images with a tripod, but you lose some flexibility.
Most birds are highly active and they are not going to pose
for you. Birds like chickadees are usually fluttering
all over the place. My
approach to bird photography is usually to just walk through a
wooded area and photograph the birds I see. I like
taking hand held shots. I know that I could get better
quality images if I used a tripod but the experience with a
handheld camera is much more enjoyable. I am able to
respond faster to a bird that perches next to me, and move with
the bird when it moves. The chickadee in this photo
landed on an apple above me and was only there for a few
seconds. While I would have liked to have time to make adjustments,
if my camera had been on a tripod I wouldn't have even gotten
the shot. It's true you can get more crystal
clear images with a tripod, but you lose some flexibility.
Most birds are highly active and they are not going to pose
for you. Birds like chickadees are usually fluttering
all over the place.
Photographing Birds in Flight
 Photographing
birds in flight can be fun. Many digital cameras have a
tracking function. With these you focus on the bird, and
then as you track it the lens will keep focus. There are
basically two ways to photograph flying birds. The first
is to focus on a point in the bird's flight path, and snap the
shot as it goes by. The second is to track the bird with
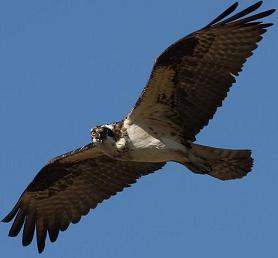
your camera. A fast shutter speed of at least 1/500 of a
second is recommended. By using a slower shutter speed
you can capture wing motion. In the osprey photo I
tracked him as he circled above me. Every time he would
come around he would look at me. Photographing
birds in flight can be fun. Many digital cameras have a
tracking function. With these you focus on the bird, and
then as you track it the lens will keep focus. There are
basically two ways to photograph flying birds. The first
is to focus on a point in the bird's flight path, and snap the
shot as it goes by. The second is to track the bird with
your camera. A fast shutter speed of at least 1/500 of a
second is recommended. By using a slower shutter speed
you can capture wing motion. In the osprey photo I
tracked him as he circled above me. Every time he would
come around he would look at me.
Use Your Yard
An easy inexpensive way to get started in bird photography
is to set bird feeders and a birdbath in your yard.
Choose an open area where the birds will get direct sunlight,
showing off their magnificent colors. For the best bird
photography you will want the sun in back of you.
Try using props
 Occasionally
I will place a stick where I think a bird might land on it,
giving me a desired photo. Birds will often land on a
stick or post near a suet or seed feeder before going to the
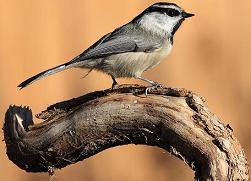
feeder. For these chickadee shots I
placed sticks near a feeder. The background was just an out
of focus fence but you can use anything you want for a background,
and then wait for a bird to perch. Occasionally
I will place a stick where I think a bird might land on it,
giving me a desired photo. Birds will often land on a
stick or post near a suet or seed feeder before going to the
feeder. For these chickadee shots I
placed sticks near a feeder. The background was just an out
of focus fence but you can use anything you want for a background,
and then wait for a bird to perch.
 Birds
coming to your feeders will often get used to you and you can
just sit nearby and wait for a good shot. Birds
coming to your feeders will often get used to you and you can
just sit nearby and wait for a good shot.
Equipment
When I started photography the only choice was film.
You would take your pictures, and until you had the film
developed you weren't really sure what you had. I fought
the transition to digital, but what won me over was the
instant gratification of seeing my pictures on my computer
right away.
Photographers today have a dizzying array of cameras, and equipment
to choose from. Since you will probably be shooting in a
variety of situations I highly recommend you get a camera that
has interchangeable lenses.
Most of the photos on this site were taken with a Canon
EOS 40D and a 70 to 300 IS zoom lens. I like the
camera size and the controls are easy to use. The 300 allows me
to get close ups of small song birds without getting so close
they are spooked. I often take a 500 mm with me but the
300 is usually on my camera. The longer the lens the
farther you can be from the bird, but there are other
considerations. Long telephoto lenses are expensive.
You also need to consider the aperture. A smaller
aperture lets in less light than a larger one. The
aperture will be shown on the lens barrel in f-stop numbers
such as f 8 or f 16. If you let less light in because of
the aperture you need to use a slower speed to compensate so
you can get the correct exposure. The shutter speed is
the amount of time the shutter is open. The faster the
shutter speed is the more motion you can freeze.
Anything below 1/60 of a second on a normal lens will probably
blur your image because of camera shake. The longer the
lens the higher the speed you will need to use in order to
reduce the effects of camera shake. A larger aperture
gives you a larger depth of field. For instance an
aperture of f-16 may put everything from the bird’s beak to
its tail in focus, while with a small aperture of f-2.8 only
the bird’s beak, and eye may be in focus. Basically
when you move up an f stop or speed you double the amount of
light hitting your light sensor, and when you move down one
stop or speed you cut the amount of light in half.
Good cameras will also have an ISO setting. ISO
determines how sensitive the image sensor is to light and it
is the third ingredient for proper exposure. If you set
a higher ISO setting you can you can use higher speeds but the
image quality suffers because at the higher ISO you will have
more noise.
Zoom lenses with image stabilization are quite a bit more
expensive, however if you can afford the extra money they are
worth it. IS will
reduce camera shake usually by a couple of f stops. For
instance if you are shooting at 1/250th of a second, the IS
lens will let you shoot the same shot at 1/60th of a second.
Most professionals use a tripod so they can reduce
camera shake allowing them to use slower shutter speeds or
smaller apertures.
You will get higher quality pictures with a 12 megabyte
camera than a 5 megabyte camera because 12 megabytes means you
have higher resolution or more pixels. Here
is an explanation of pixels.
Here are some recommended cameras.
Read about binoculars for bird
watching
or
Go to the binocular store.

|